Spring Cloud Security 为构建安全的SpringBoot应用提供了一系列解决方案,结合Oauth2可以实现单点登录、令牌中继、令牌交换等功能,参考阮一峰 (opens new window)
# 概念
# Oauth2
OAuth(开放授权)是一个开放标准,允许用户授权第三方移动应用访问他们存储在另外的服务提供者上的信息,而不需要将用户名和密码提供给第三方移动应用或分享他们数据的所有内容,OAuth2.0是OAuth协议的延续版本,但不向后兼容OAuth 1.0即完全废止了OAuth1.0。
场景:第三方QQ、微信、支付宝授权登录
# 相关名词
- Resource owner(资源拥有者:
登陆用户):拥有该资源的最终用户,他有访问资源的账号密码; - Resource server(资源服务器):拥有受保护资源的服务器,如果请求包含正确的访问令牌,可以访问资源;
- Client(客户端:
使用第三方账号授权登陆的app、web等应用):访问资源的客户端,会使用访问令牌去获取资源服务器的资源,可以是浏览器、移动设备或者服务器; - Authorization server(认证服务器):用于认证用户的服务器,如果客户端认证通过,发放访问资源服务器的令牌。
# 授权模式
- 授权码模式(authorization code)(常用):正宗的OAuth2的授权模式,客户端先将用户导向认证服务器,登录后获取授权码,然后进行授权,最后根据授权码获取访问令牌
- 密码模式(resource owner password credentials)(常用):和授权码模式相比,取消了获取授权码的过程,直接获取访问令牌
- 简化模式(implicit):客户端直接向用户获取用户名和密码,之后向认证服务器获取访问令牌
- 客户端模式(client credentials):客户端直接通过客户端认证(比如client_id和client_secret)从认证服务器获取访问令牌
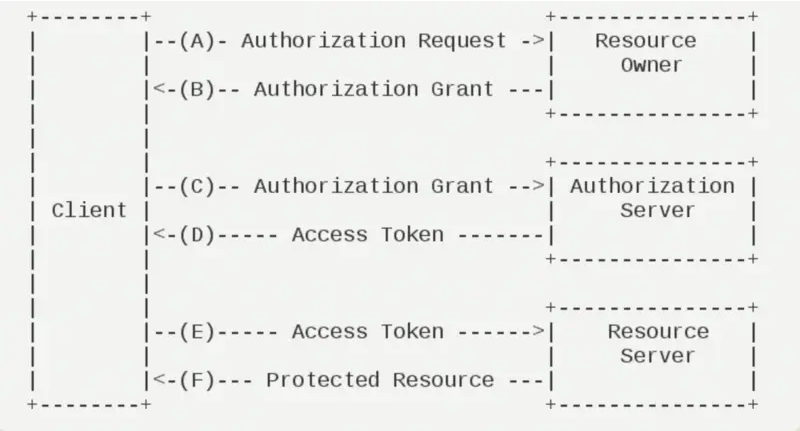
# 授权码模式
- (A)用户打开客户端以后,客户端要求用户给予授权(前端,携带回调地址,跳转三方登陆或者弹出窗口,要求授权)
- (B)用户同意给予客户端授权(前端,用户密码登陆或者扫码确定授权)
- (C)客户端使用上一步获得的授权,向认证服务器申请令牌(后端,携带授权码申请令牌)
- (D)认证服务器对客户端进行认证以后,确认无误,同意发放令牌,有需要带上刷新令牌(后端,认证通过,返回令牌)
- (E)客户端使用令牌,向资源服务器申请获取资源(后端,卸载令牌,访问资源,登陆)
- (F)资源服务器确认令牌无误,同意向客户端开放资源(前端,登陆成功,访问具体资源)
# 实例分析:
用户登陆A.com,需要三方授权,跳转到B.com,授权成功,跳转回来,登陆成功
A,获取授权码,用户登陆 A.com,选用三方登陆,前端进行弹出窗口或这跳转链接到 B.com 要求用户登陆,发起的请求链接如下:
https://b.com/oauth/authorize?response_type=code&
  client_id=CLIENT_ID&
  redirect_uri=CALLBACK_URL&
  scope=read
2
3
4
参数说明
上面 URL 中,
response_type参数表示要求返回授权码(code)
client_id参数让 B 知道是谁在请求,
redirect_uri参数是 B 接受或拒绝请求后的跳转网址
scope参数表示要求的授权范围(这里是只读)
B,用户输入密码,或者扫码成功后,确认授权登陆,返回下面信息,callback是之前设置的回调地址,code参数就是授权码
https://a.com/callback?code=AUTHORIZATION_CODE
C,后端拿着这个授权码,向认证服务器申请令牌
https://b.com/oauth/token?
	client_id=CLIENT_ID&
	client_secret=CLIENT_SECRET&
	grant_type=authorization_code&
	code=AUTHORIZATION_CODE&
	redirect_uri=CALLBACK_URL
2
3
4
5
6
参数说明
# 上面 URL 中,

`client_id`参数和`client_secret`参数用来让 B 确认 A 的身份(`client_secret`参数是保密的,因此只能在后端发请求),
`grant_type`参数的值是`AUTHORIZATION_CODE`,表示采用的授权方式是授权码,
`code`参数是上一步拿到的授权码,
`redirect_uri`参数是令牌颁发后的回调网址。
2
3
4
5
6
D,认证服务器返回令牌
{
  "access_token":"ACCESS_TOKEN",
  "token_type":"bearer",
  "expires_in":2592000,
  "refresh_token":"REFRESH_TOKEN",
  "scope":"read",
  "uid":100101,
  "info":{...}
}
2
3
4
5
6
7
8
9
E,客户端拿到令牌后,携带令牌访问用户资源,即登陆成功
https://a.com/xxx
header中添加 Authorization Bearer 396465c0-ef6e-4c0d-8b76-b43ac2b6f715
Bearer 后面的即为之前拿到的令牌
2
3
# 密码模式
- (A)客户端从用户获取用户名和密码
- (B)客户端通过用户的用户名和密码访问认证服务器
- (C)认证服务器返回访问令牌(有需要带上刷新令牌)

这个相比之前的授权码模式,简化了获取授权码的步骤,直接是客户端拿到用户的用户名和密码,直接向认证服务器申请令牌,grant_type的值为password,请求如下:
这种方式风险很大,因此只适用于其他授权方式都无法采用的情况,而且必须是用户高度信任的应用
https://oauth.b.com/token?
  grant_type=password&
  username=USERNAME&
  password=PASSWORD&
  client_id=CLIENT_ID
2
3
4
5
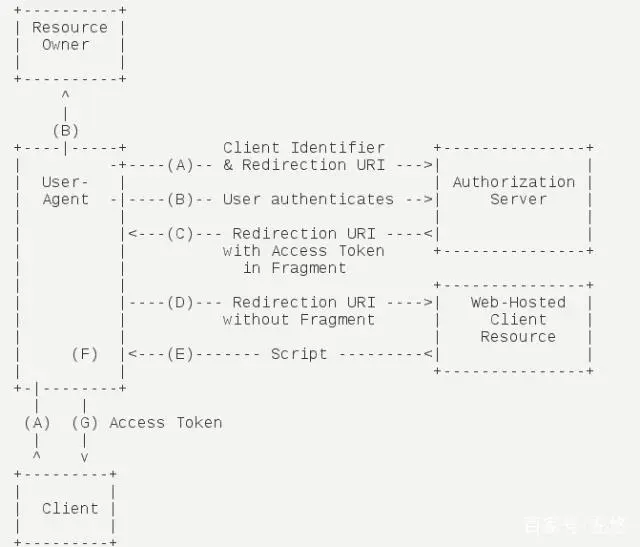
# 简化模式(未尝试)
简化模式(implicit grant type)不通过第三方应用程序的服务器,直接在浏览器中向认证服务器申请令牌,跳过了"授权码"这个步骤,因此得名。所有步骤在浏览器中完成,令牌对访问者是可见的,且客户端不需要认证,
这种方式把令牌直接传给前端,是很不安全的。因此,只能用于一些安全要求不高的场景,并且令牌的有效期必须非常短,通常就是会话期间(session)有效,浏览器关掉,令牌就失效了
- (A)客户端将用户导向认证服务器
- (B)用户决定是否给于客户端授权
- (C)假设用户给予授权,认证服务器将用户导向客户端指定的"重定向URI",并在URI的Hash部分包含了访问令牌。
- (D)浏览器向资源服务器发出请求,其中不包括上一步收到的Hash值
- (E)资源服务器返回一个网页,其中包含的代码可以获取Hash值中的令牌
- (F)浏览器执行上一步获得的脚本,提取出令牌
- (G)浏览器将令牌发给客户端
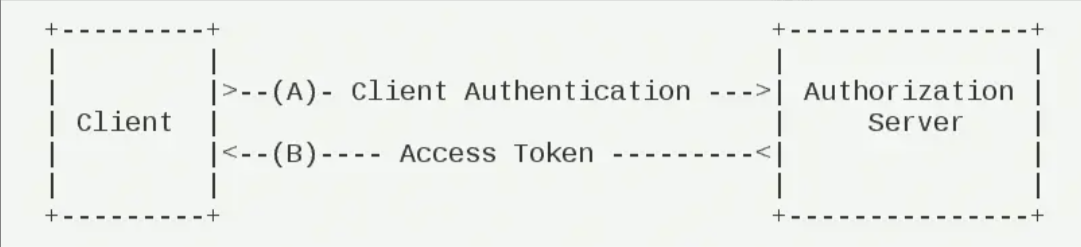
# 客户端模式(未尝试)
- (A)客户端向认证服务器进行身份认证,并要求一个访问令牌。
- (B)认证服务器确认无误后,向客户端提供访问令牌。
注意:
A步骤中,客户端发出的HTTP请求,包含以下参数:
- granttype:表示授权类型,此处的值固定为"clientcredentials",必选项。
- scope:表示权限范围,可选项
# 创建Oauth2-server模块
作用:模拟资源服务器,认证服务器,接口调用
- pom依赖
<dependency>
    <groupId>org.springframework.cloud</groupId>
    <artifactId>spring-cloud-starter-oauth2</artifactId>
</dependency>
<dependency>
    <groupId>org.springframework.cloud</groupId>
    <artifactId>spring-cloud-starter-security</artifactId>
</dependency>
<dependency>
    <groupId>org.springframework.boot</groupId>
    <artifactId>spring-boot-starter-web</artifactId>
</dependency>
2
3
4
5
6
7
8
9
10
11
12
- application-yml
server:
  port: 9401
spring:
  application:
    name: oauth2-service
2
3
4
5
- 添加UserService实现UserDetailsService接口,用于加载用户信息
初始化一些用户信息
@Service
public class UserService implements UserDetailsService {
    private List<User> userList;
    @Autowired
    private PasswordEncoder passwordEncoder;

    @PostConstruct
    public void initData() {
        String password = passwordEncoder.encode("123456");
        userList = new ArrayList<>();
        userList.add(new User("macro", password, AuthorityUtils.commaSeparatedStringToAuthorityList("admin")));
        userList.add(new User("andy", password, AuthorityUtils.commaSeparatedStringToAuthorityList("client")));
        userList.add(new User("mark", password, AuthorityUtils.commaSeparatedStringToAuthorityList("client")));
    }

    @Override
    public UserDetails loadUserByUsername(String username) throws UsernameNotFoundException {
        List<User> findUserList = userList.stream().filter(user -> user.getUsername().equals(username)).collect(Collectors.toList());
        if (!CollectionUtils.isEmpty(findUserList)) {
            return findUserList.get(0);
        } else {
            throw new UsernameNotFoundException("用户名或密码错误");
        }
    }
}
2
3
4
5
6
7
8
9
10
11
12
13
14
15
16
17
18
19
20
21
22
23
24
25
- 添加
认证服务器配置,使用@EnableAuthorizationServer注解开启
模拟认证服务器配置
@Configuration
@EnableAuthorizationServer
public class AuthorizationServerConfig extends AuthorizationServerConfigurerAdapter {

    @Autowired
    private PasswordEncoder passwordEncoder;

    @Autowired
    private AuthenticationManager authenticationManager;

    @Autowired
    private UserService userService;

    /**
     * 使用密码模式需要配置
     */
    @Override
    public void configure(AuthorizationServerEndpointsConfigurer endpoints) {
        endpoints.authenticationManager(authenticationManager)
                .userDetailsService(userService);
    }

    @Override
    public void configure(ClientDetailsServiceConfigurer clients) throws Exception {
        clients.inMemory()
                .withClient("admin")//配置client_id
                .secret(passwordEncoder.encode("admin123456"))//配置client_secret
                .accessTokenValiditySeconds(3600)//配置访问token的有效期
                .refreshTokenValiditySeconds(864000)//配置刷新token的有效期
                .redirectUris("http://www.baidu.com")//配置redirect_uri,用于授权成功后跳转
                .scopes("all")//配置申请的权限范围
                .authorizedGrantTypes("authorization_code","password");//配置grant_type,表示授权类型
    }
}
2
3
4
5
6
7
8
9
10
11
12
13
14
15
16
17
18
19
20
21
22
23
24
25
26
27
28
29
30
31
32
33
34
- 添加
资源服务器配置,使用@EnableResourceServer注解开启
模拟资源服务器配置
@Configuration
@EnableResourceServer
public class ResourceServerConfig extends ResourceServerConfigurerAdapter {

    @Override
    public void configure(HttpSecurity http) throws Exception {
        http.authorizeRequests()
                .anyRequest()
                .authenticated()
                .and()
                .requestMatchers()
                .antMatchers("/user/**");//配置需要保护的资源路径
    }
}
2
3
4
5
6
7
8
9
10
11
12
13
14
- 添加
SpringSecurity配置,允许认证相关路径的访问及表单登录
过滤不需认证的路径
@Configuration
@EnableWebSecurity
public class SecurityConfig extends WebSecurityConfigurerAdapter {

    @Bean
    public PasswordEncoder passwordEncoder() {
        return new BCryptPasswordEncoder();
    }

    @Bean
    @Override
    public AuthenticationManager authenticationManagerBean() throws Exception {
        return super.authenticationManagerBean();
    }

    @Override
    public void configure(HttpSecurity http) throws Exception {
        http.csrf()
                .disable()
                .authorizeRequests()
                .antMatchers("/oauth/**", "/login/**", "/logout/**")
                .permitAll()
                .anyRequest()
                .authenticated()
                .and()
                .formLogin()
                .permitAll();
    }
}
2
3
4
5
6
7
8
9
10
11
12
13
14
15
16
17
18
19
20
21
22
23
24
25
26
27
28
29
- 测试接口,返回认证信息
测试接口
@RestController
@RequestMapping("/user")
public class UserController {
    @GetMapping("/getCurrentUser")
    public Object getCurrentUser(Authentication authentication) {
        return authentication.getPrincipal();
    }
}
2
3
4
5
6
7
8
# 测试
# 授权码模式大致流程
启动auth2-server服务
访问地址 (opens new window):模拟用户登陆时候,选择三方登陆,统一授权,返回的url中,包含了认证服务器给的授权码
https://www.baidu.com/?code=11KUJe&state=normal`
携带授权码,向认证服务器申请令牌,认证服务器返回令牌
携带令牌访问资源,用户使用三方账号登陆成功